
Build a user port WiFi modem with an ESP8266 and Bo Zimmerman’s Zimodem firmware
There is a particular kind of satisfaction in loading a terminal program written in 1987, typing ATD, and watching a BBS answer. Not an emulator. Not a simulation. A real Commodore 64, on a real network, dialing a real board that a real person is running somewhere in the world tonight.
The remarkable part is how little it costs to get there. Two components, a soldering iron, and an afternoon. The parts are cheaper than a pizza, and the firmware is free.
This is the companion piece to our August 2026 cover feature, The Connected 8-Bit, which traces how retro machines found their way onto the internet. That article makes an argument: the trick every platform eventually landed on was to stop asking the 8-bit to do the hard part, and instead bolt on a modern coprocessor that handles TCP/IP while the old machine does what it always did. What follows is that idea reduced to its cheapest possible form. Your C64 will think it is talking to a Hayes modem. It is actually talking to a 32-bit microcontroller running at 80 MHz with a full WiFi stack, which is roughly eighty times the clock speed of the machine it serves and has more RAM than the 64 has address space.
It works beautifully.
What you need
Just two parts do the whole job.
A NodeMCU ESP8266 development board. Any board that breaks out GPIO 4 and GPIO 5 will work. These come in two common flavors, distinguished by the USB-to-serial chip: CP2102 or CH340. Either is fine, but note which one you have, because you may need that specific driver on your PC to flash it. Avoid the tiny 8-pin ESP-01 modules. They are cheaper still, but they do not expose enough GPIO pins for hardware flow control, which caps you at 2400 baud.
One warning on physical size, learned the hard way by people who build these into cases: NodeMCU boards come in a narrow version and a wide version. The narrow one, about 25.4 mm across, is the one that fits most published PCB layouts and 3D printed enclosures. If you plan to box it up later, measure before you buy.
A C64 user port plug. This is a 24-pin card edge connector, two rows of twelve, on 0.156 inch pitch. Sold as a “2×12 24-pin card edge connector.” This is the part that trips people up when ordering, because 0.100 inch pitch connectors look similar in listing photos and will not fit. Check the pitch.
Optional but useful: a scrap of prototype board to mount everything on, and some hookup wire. Most people building a first one just solder wires directly between the module and the connector.
For tools you need only a soldering iron and wire. No specialized equipment, no programmer, no level shifters (more on that below).
What it actually costs
Here is where the “ten bucks” claim needs honesty rather than marketing.
Buying from Ebay or Amazon with fast shipping:
| Part | Typical 2026 price |
|---|---|
| NodeMCU ESP8266, single unit | $8 to $10 |
| NodeMCU ESP8266, in a 3-pack | $13 to $16, so about $5 each |
| 24-pin 0.156″ card edge connector, single | $6 to $8 |
| Card edge connector, 2-pack or more | $9 to $12, so about $4 each |
| Prototype board (from an assortment) | under $1 |
A single unit bought as singles lands around $15 to $18 delivered. Buy the multipacks and the per-modem cost drops to roughly $10, which is the number in the headline, and you end up with spare parts for the next one. Since you will almost certainly build a second one for a friend, the multipack is the sensible purchase.
Buying from overseas sellers with slow shipping:
The same two parts from AliExpress or eBay sellers shipping from Asia run about $2.50 to $4.00 for the ESP module and $1.50 to $3.00 for the connector, usually with free shipping. Total: $4 to $7 per modem, with a three to six week wait. If you are patient, or building several, this is genuinely half price.
Where the savings actually are: the connector, not the module. ESP8266 boards are commodity items priced within pennies of each other everywhere. Card edge connectors on 0.156 inch pitch are a specialty item, and the markup on Amazon listings is where most of the cost hides. If you buy nothing else overseas, buy the connectors overseas.
A note on shipping math that catches people out: if you are ordering from Amazon anyway and have a subscription that covers shipping, the marginal cost of adding these to an existing order is just the item price. If you are placing a standalone order, add shipping to every figure above. Free shipping thresholds are why the multipack often costs less in total than the single.
The firmware: Zimodem
The software that makes this work is Zimodem, written and still actively maintained by Bo Zimmerman. It is open source under the Apache 2.0 license, and the current release as of this writing is 4.0.2. The copyright line on the source reads 2016 through 2026, which tells you something about the maintenance commitment behind it.
Zimodem’s job is deception, and it performs it with real elegance. It listens on the serial line for Hayes AT commands, the same command language modems have spoken since 1981, and translates them into modern socket operations. When your terminal program sends ATD"bbs.example.com:23", Zimodem resolves the hostname, opens a TCP connection, and starts shuttling bytes. Your 1987 terminal program has no idea anything has changed. As far as it knows, it just dialed a phone.
What Zimodem does beyond the basics is where it earns its reputation:
- PETSCII translation on the fly. Add a
Pmodifier to most commands and Zimodem converts between the ASCII internet and Commodore’s own character set mid-stream. This is why Commodore BBSes still look right. - Line ending control.
ATR0puts it in carriage-return-only mode, which is what the C64 expects. Without this, everything double-spaces. - A built-in IRC client via
AT+IRC, so a stock C64 can join a chat network. AT+PING, which is the single most useful diagnostic when you are trying to work out whether the problem is your WiFi or your wiring.- Port listeners, meaning you can host a BBS from a real C64 rather than only calling them.
- Over-the-air updates.
AT&Uchecks for a new firmware version andAT&U6502installs it. A modem that updates itself, attached to a machine from 1982. - Q-Link support. Add a phonebook entry with
ATP"5551212=q-link.net:5190"and the original Q-Link client will dial it as a Hayes-compatible 1200 baud modem.
Get it from github.com/bozimmerman/Zimodem.
Flashing it
If you are building from source, note two requirements that cause most of the failures people report. First, Bo specifies the Arduino IDE 1.8.10 with the ESP8266 board libraries at version 2.7.4, and warns that newer versions may not work. This is not the usual “should be fine on newer” situation. People genuinely hit build errors on current toolchains. Second, you must enable SPIFFS in the IDE settings, using something like the 1M/160k split. SPIFFS is the little flash filesystem where Zimodem stores your settings. If you build without it, everything will appear to work until you power cycle, at which point the modem forgets your WiFi password and baud rate and you will be very confused. AT&W cannot save to a filesystem that does not exist.
If you would rather not build it yourself, check the project’s Releases page for prebuilt binaries and flash with any standard ESP flashing tool.
Whichever route you take, install the USB serial driver for your board’s chip (CP2102 or CH340) first, or your PC will not see the module at all.
Wiring it up
Seven wires, six of them mandatory.
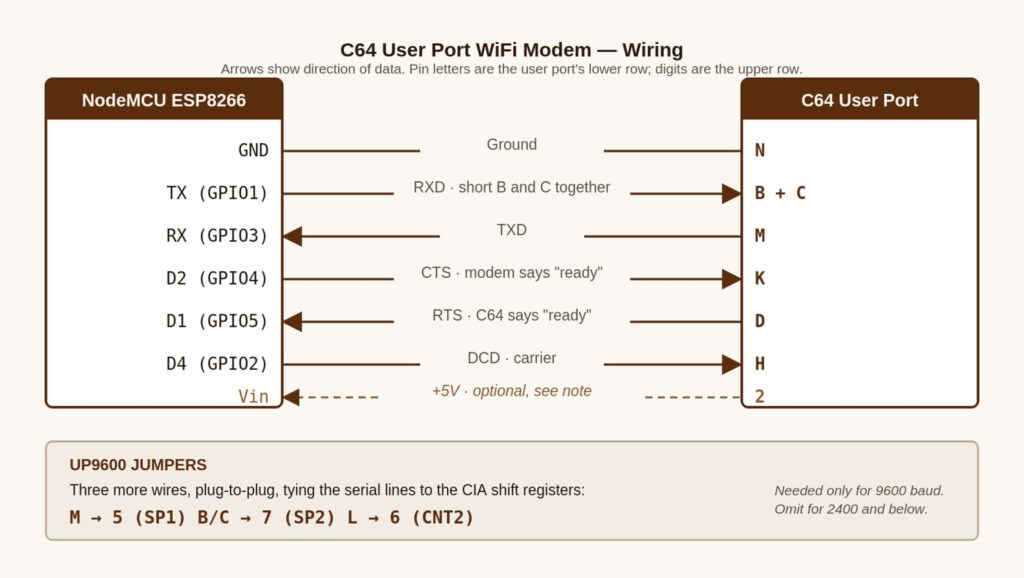
| ESP8266 | User port | Signal |
|---|---|---|
| GND | N | Ground |
| TX (GPIO1) | B and C | Data to the C64. Short B and C together. |
| RX (GPIO3) | M | Data from the C64 |
| D2 (GPIO4) | K | CTS: the modem telling the C64 it is ready |
| D1 (GPIO5) | D | RTS: the C64 telling the modem it is ready |
| D4 (GPIO2) | H | DCD: carrier detect |
| Vin | 2 | +5V, optional. See the power note below. |
Then three more jumpers, plug to plug:
M → 5 B/C → 7 L → 6
Those pin letters are the user port’s lower row, and the digits are the upper row.
A convenient accident worth knowing: these are the same pin assignments used by the older Paul Rickards lineage of ESP modem firmware that most published C64 WiFi modem guides describe. Zimodem’s defaults happen to land on exactly the same GPIOs. Its S49 register sets the CTS pin and defaults to 5, S51 sets the RTS pin and defaults to 4, and S47 sets the DCD pin and defaults to 2. So a modem built to any of the popular published wiring diagrams will run Zimodem without rewiring anything. You can flash back and forth between firmwares and compare.
What those three jumpers actually do
Most build guides list the M→5, B/C→7, L→6 jumpers without explanation, which has left a lot of builders soldering wires on faith. Here is what is going on, because it is genuinely clever.
The C64’s user port serial lines run through CIA chip port pins, and the standard KERNAL RS-232 routines bit-bang them in software. That software is the bottleneck. It is why a stock C64 struggles above 1200 baud and gives up entirely somewhere around 2400.
But the 6526 CIA chips also contain hardware shift registers, with their own dedicated pins: SP1 and SP2 for serial data, CNT1 and CNT2 for the clocks. A shift register assembles a byte in hardware, without the CPU counting cycles for every single bit.
The three jumpers wire the serial data lines over to those shift register pins. Pin 5 is SP1, pin 7 is SP2, and pin 6 is CNT2. Terminal software written for UP9600 knows to use the shift registers instead of the KERNAL routines, and that hardware assist is what gets a 1 MHz machine to 9600 baud reliably.
This matters practically: if you only want 1200 or 2400 baud, skip the three jumpers entirely. They do nothing for you. If you want 9600, you need all three, and you need terminal software that supports UP9600. CCGMS is the usual choice.
It also explains a gotcha that otherwise seems arbitrary. On a C128 in 128 mode, those same three lines interfere with 1571 disk access, because the shift registers are spoken for. Disconnect the jumpers when you need the drive.
About power, and the argument nobody wins
You can power the ESP module from the user port’s +5V on pin 2, or from its own USB supply. This is the most argued-about detail in the entire hobby, so here are the actual facts.
The user port’s 5V rail is commonly cited as rated for about 100 mA. A NodeMCU can draw more than that, with measurements reported in the 135 mA range and manufacturer figures sometimes higher. So yes, you are at or over the documented limit.
Against that: a great many people have run these off user port power for years without incident, including the author of the most widely followed build guide, who has been quite direct about his irritation at being told it cannot be done. The counter-argument is equally reasonable, which is that the person insisting it is fine is usually running a healthy modern power supply rather than a forty-year-old original brick, and the original bricks are notorious.
Our recommendation, which sidesteps the whole thing: power the ESP from its own USB supply and leave pin 2 unconnected. A phone charger costs nothing, you probably have six, and the question evaporates. If you would rather have a single cable and you know your C64’s power supply is in good health, connect pin 2 and get on with your life. Both camps are describing real experience.
The related question is level shifting. The ESP8266 runs at 3.3V and the user port is 5V TTL. Direct connection is what most published designs do, and it generally works, because a 3.3V CMOS output comfortably clears the 2.4V threshold a 5V TTL input needs to read a logic high. The risk runs the other direction, into the ESP’s inputs. If you want to be careful, Sven Petersen’s open source C64-WiFi-Modem-User-Port board on GitHub includes proper level shifters along with status LEDs and a reset switch, and his parts total came to a little over 16 euros. That is the grown-up version of this project and a good second build.
First boot
Zimodem starts at 1200 baud, so set your terminal there first. Load CCGMS, select User Port, choose 1200, and press RETURN. You should see Zimodem’s banner.
Work through these in order:
ATI                          show version, confirm it is alive
ATR0                         carriage return only, for Commodore
AT&P1                        PETSCII command mode
ATW"MyNetwork,MyPassword"    join your WiFi
AT+PING"google.com"          confirm you are actually online
AT&W                         save all of it
If AT+PING returns OK, the hard part is done. Everything after this is preference.
To go faster, turn on flow control and change speed:
AT&K3                        RTS/CTS hardware flow control
ATB9600                      switch to 9600 baud
The modem changes speed immediately, so your terminal will turn to garbage until you follow it. Go to the CCGMS settings menu, switch to UP9600 at 9600 baud, and come back. Type AT and you should get OK. Then save with AT&W so it comes up this way every time.
To dial a board:
ATD"bbs.example.com:6502"
Use ATDT instead if the far end needs telnet protocol negotiation, or set ATS62=1 to make telnet the default. +++ gets you back to command mode.
A good first call is coffeemud.net:23, which is Bo Zimmerman’s own system and therefore the most likely thing in the world to work with his firmware.
If something is wrong
Nothing at all on screen. Check baud rate before you check anything else: Zimodem defaults to 1200 and most guides written for other firmware start you at 300. Then check that you shorted B and C together, which is the single most commonly missed connection.
It works but forgets everything on power cycle. SPIFFS was not enabled when the firmware was built, so AT&W has nowhere to write. Reflash with a build that includes it.
Garbage at 9600 but fine at 1200. Either the three UP9600 jumpers are missing, or your terminal is not in UP9600 mode, or flow control is off. All three must line up.
Everything locks up the moment you enable flow control. Your RTS and CTS are crossed. They connect to opposite pins, not matching ones: the modem’s RTS output goes to the C64’s CTS input and vice versa. Swap the wires on K and D.
Signals seem inverted, or carrier detect reads backwards. Here is a real subtlety. Commodore’s user port treats HIGH as active, while standard RS-232 treats LOW as active, so Zimodem has to invert its signals for Commodore machines. Historically the ESP8266 build shipped inverted by default, which was correct for us and wrong for everyone else. There are reports that this default changed in the 4.0.2 release to match standard RS-232, which would flip the situation for Commodore users. Rather than trust any published default, check yours directly with ATI5, which lists every S register, and set the ones you need explicitly:
ATS46=0    DCD:  0 = HIGH is active (Commodore), 1 = LOW is active (RS-232)
ATS48=0    CTS:  same convention
ATS50=0    RTS:  same convention
Then AT&W. Setting these explicitly rather than relying on defaults costs you one command and saves an evening.
Where to call
The boards are still running, and new ones still launch. Start with the Commodore BBS Outpost directory for a current list of active C64 systems, and the Telnet BBS Guide for the wider world. Bo’s own board at coffeemud.net:23 is a reliable first call. Q-Link Reloaded has brought back the online service many of us first logged into, and Zimodem supports it directly.
Then, if you want the full experience, set up a listener with ATS0=1 and ATS41=1 and let your C64 answer calls of its own.
Credits
Zimodem is the work of Bo Zimmerman, who has maintained it for a decade and whose archives have preserved an enormous amount of Commodore software besides. The wiring this article describes traces back to the ESP modem firmware work of Paul Rickards, and the widely followed C64 build guide published by Alwyz at 1200baud, with contributions from Eightbitswide and xxValiumxx. Sven Petersen’s open hardware design is the reference for anyone wanting a properly level-shifted board. Allen Huffman at Sub-Etha Software documented the RS-232 side of Zimodem in detail and first mapped out the Commodore signal inversion problem for the rest of the world.
None of them charged anybody anything for this. That is worth remembering the first time your breadbox connects.
This article accompanies “The Connected 8-Bit: How Retro Machines Went Online,” the cover feature in the August 2026 issue of COMPUTE!’s Gazette.